A Completed Pull Request
Takeaway:
Virtual Environment
Branch Operation
Continuous Integration
Search how to download git as a command line tool in your computer.
Find the codebase url through the green button on our GitHub repository.

Use
git clone <url>to clone the remote codebase into your local machine through the command line. No worry if your shell (command line) looks different from mine (The operations are same in the Mac and Windows systems).
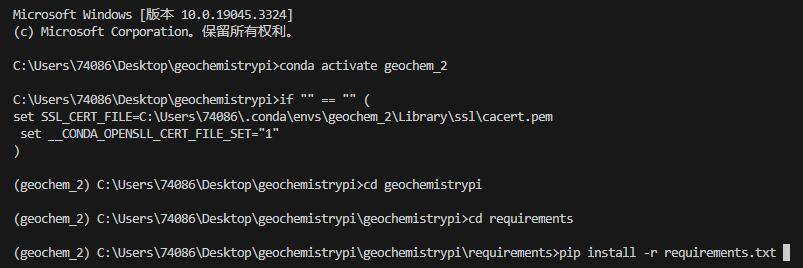
Switch into geochemistrypi repository. Activate your virtual environment (venv or conda). In this case, I use conda to set up. It is a good habit to use a specific virtual environment for a specific Python project. Then, use
pip install -r requirements.txtto download the dependencies.
Use
pre-commit installto set up the git hook scripts, which will be used later on, no need to worry! You only need to run this command once in this local repository unless you clone another one again in other local directory.

Use Visual Studio Code (Recommended IDE) to open the codebase and don’t forget to activate your virtual environment as the picture shows below.

Create a new git branch to develop on your own path. You can name the branch name as your identification or as the function you are going to build up.


Do some modifications on the codebase. For example, in this case, I update the badge information of READM.md.

After finishing modifications on the codebase, you need to use
git statusto check what file has been modified.
It is a good habit to use
git diff <filename>check whether the changed content on that specific files respectively is what you desire to make. After enter the command, the console will switch into diff display. In diff displays , press the keybordjto scroll down and press the keyboardkto scroll up.+refers to the line added while-refers to the line deleted. Press the keyboardqto exit from the diff display after checking.

Use
git add <filename>to staged the files for commit.
Use
git commit -m "tag: message"to make a local commit. It is a good habit to follow up the principle that one commit for one functionality implementation or one optimization or one bug fix. It is allowed to push multiple commits to the remote codebase with one pull request.Please include the following tags in the beginning of your commit message to make more organized commits and PRs. It would tell exactly what use it is in this commit.
feat: a new feature is introduced with the changesfix: a bug fix has occurredperf: an existing feature improveddocs: changes to the documentationstyle: code formattingrefactor: refactoring production coderevert: version revertionchore: the change of developing tools or assisted tooltest: adding missing tests, refactoring testsbuild: package the codebaseci: continue integrationBREAKING CHANGE: a breaking API change

Continuous Integration (CI): In our codebase, we set up a pre-commit locally before. Normally, it will automatically check code grammar and correct code styles for your commited code.
In this successful case, it indicates that everything works well. No code grammar mistake and code style conforms to the configuration. Hence, no need to do further, you can push the local commit to remote codebase in the GitHub.

In another failed case (I did another experiment before, not in this docs!), it indicates that there are three files where import statements don’t conform to the specification. Hence, it corrects them for you, which means that you don’t need to manually correct them by yourself.

The next step is to use
git statusandgit diffto check the details in the corrected files to see what CI tool has done for you.

You would see that you need to use
git addagain. Because CI tool has modified your code , you need to do a standard git commit process again.
Again, you need to run
git commitagain. Just use the previous same command. Now, it passes! Fancy is it? Until now, you are allowed to push the local commit to remote codebase in the GitHub.
Back to the successful case. Now, it is time to push your local dev/Sany branch to the remote dev/Sany branch. It may not created yet, but no worried, it will be shown later. Firstly, use
git pull origin main --rebase. This command pulls the latest changes from the remote main branch and applies them to your local dev/Sany branch, while also rebasing your local changes on top of the new changes from the remote.No conflict case: In this example, it indicates that there is no conflict with the remote main branch. Quite normally, sometimes, when you are coding in your own branch, the remote main branch is far ahead of yours. It is likely that there are conflicts existing so you need to resolve the conflicts before merge your remote dev/Sany branch into remote main branch.
The way through
git pull origin main --rebasecan save you troubles. If there are any conflicts between your local dev/Sany changes and the remote main branch’s changes, Git will stop the rebase process and alert you that there are conflicts that need to be resolved. In this case, there is no conflict at all.
If in your own case, there are some conflicts, to resolve the conflicts, you will need to edit the affected files manually on VSCode IDE to resolve the differences between the conflicting changes. Once you have made the necessary changes, you can stage the changes using
git add, and then usegit rebase --continueto continue the rebase process.Git will then apply your local changes on top of the new changes from the remote, incorporating the changes you made to resolve the conflicts. It’s worth noting that resolving conflicts can sometimes be a complex process, especially when there are multiple conflicts across several files. If you’re not familiar with resolving conflicts in Git, it’s a good idea to read up on it first or seek help from experienced Git users (Sany or others) to avoid any unintended consequences.
The picture below is the successful case without conflicts.
After resolving all conflicts, you can then use
git push origin dev/Sany:dev/Sanyto push your local changes to the remote repository. This command pushes your local dev/Sany branch to the remote repository and creates a new remote dev/Sany branch if it does not exist yet. The colon (:) separates the local branch name from the remote branch name.(2)Unstaged changes case: In this example, it indicates that some files, which are modified and tracked by git, haven’t been commited yet. Probably, these files are not the ones you want to push because they are under development. In Git’s protection mechanism, when there is some tracked and modified files in your working directory, you are not allowed to pull and merge the remote branch main into your local branch. However, if your working directory only includes untracked files, this problem like the picture shown below wouldn’ t happend.
Fortunately, you can use
git stash pushto save those changed files into a hidden zone temporarily without committing them.Now, you can use
git pull origin main --rebaseand follow the same procedure as in the no conflict case.Once you finish pushing, you can use
git stash popto bring back the modified files into your working directory. For more information about git stash , plz google it.Now, it is time to creat your first PULL REQUEST. Wowww, what a long journey! Copy the url with underline https://github.com/ZJUEarthData/geochemistrypi/pull/new/dev/Sany (it is different in your case, check your own information) and open it with a browser. You would the page directing you to create a pull request through clicking the green button. It is done!!! Then, no need to operate anymore . As a normal developer, you are not allowed to merge by yourself. Our maintainers will check and merge later on if it is good.
The page below is only visible to our maintainers.